This blog post by Kristal Norton shows so many different applications for lettering in journaling, and I love that the letters aren't always super-polished, that some some are pasted in from found text.
These types of pages can so easily be created with your child, too! Let your toddler paint or cut pictures out of magazines to paste into a collage. Doodle/Tangle around their artwork, and add your own quotes!
Notice how, in the last photo, this artist has folded the paper around the outside of the pages -- so pretty on the outside of the journal! Time to dig out an old Moleskine!
My favorite pages from Kristal's blog post are by an artist named Jenn Olson (her site here):
Showing posts with label painting. Show all posts
Wednesday, November 19, 2014
Tuesday, October 28, 2014
Tangled Haunted House
I think I like Elle's Spooky House more... the dark colors, the flutter of fall leaves, but here is the tangled/doodled one I did this week!Monday, October 27, 2014
Toddler Spooky House
Spooky Houses
![]() |
| Jamestown Elementary Art Blog |
What I love about drawing architecture is that it can be as simple or as detailed as you like! Messy watercolor or acrylic swirls create a great background for a Sharpie-drawn or black-painted silhouette of a spooky house, black cat, ghost, or pumpkin! Add some doodles/tangles or other details with your white gel pen or some white chalk, and what a neat, creepy scene you have!
Want to customize this activity for your toddler? Have them paint the background for your scene and use a stencil to create silhouetted shapes!
I found this amazing creation on the Jamestown Elementary Art Blog. These kids are SO, SUPER talented! And kudos to these teachers for leading some incredible art adventures!
For more ideas about how to draw spooky scenes, check out our Halloween Art Board on Pinterest.
Want to share your art with us? Use #kasvtgallery to be featured on Our Gallery page!
Labels:
art,
art journal,
child,
doodle,
drawing,
Halloween,
Halloween Art,
inspiration,
kids art journal,
painting,
preschooler,
project ideas,
sketchbook,
teenager,
toddler,
tutorial,
watercolor,
zentangle
Tuesday, October 21, 2014
Silly Monsters
Mateo Dineen is one of my favorite creature illustrators! Check out more of his artwork on his site (here). Just a little parental disclaimer: some of his monsters are doing some not-so-kid-appropriate things, like smoking.
But most of them are just... lost on our planet, taking photos, or stuck with their head in a sock... doing very human things, which is hilarious.
Also, his monsters aren't that more detailed than our creature blobs. They have some more detailed eyes, shaded limbs, and FUR. I've posted some how-to pins on our Halloween Board showing how you can draw fur if you'd like to create some furrier creatures for your Halloween artwork!
BONUS: Mateo has a blog where he actually shares the process photos he takes as he creates his artwork, and you can follow him on Facebook (here)!
But most of them are just... lost on our planet, taking photos, or stuck with their head in a sock... doing very human things, which is hilarious.
Also, his monsters aren't that more detailed than our creature blobs. They have some more detailed eyes, shaded limbs, and FUR. I've posted some how-to pins on our Halloween Board showing how you can draw fur if you'd like to create some furrier creatures for your Halloween artwork!
BONUS: Mateo has a blog where he actually shares the process photos he takes as he creates his artwork, and you can follow him on Facebook (here)!
![]() |
| Mateo Dineen |
Monday, October 20, 2014
Ghouls, Monsters, and Creatures
This week, we are making creatures! I first discovered the art of imaginary creatures when I stumbled upon Carla Sonheim's blog, The Art of Silliness.
Then I took an "Unlock Your Inner Creature" class at Artists' Mediums, over the summer, with Kristin Richland. It was wonderful, and I highly recommend checking out her future creature classes! It went beyond the basics I've described below, to get your brain thinking more creatively! I loved it and have been inspired to make more creatures ever since!
Essentially, you draw any-old shape you want. You can draw it with your eyes closed, or trace the shape of an object you like. Then you add a few basic facial features, maybe some shading, and voila! A creature! Or, in honor of Halloween -- a few spiky teeth or lines for hair would make a pretty neat ghoul or monster!
Another way I love doing this is by painting (using your acrylic spray-paints or just making swishes on the page). Then, I look for animal- or people-like shapes in the blobs of dark and light paint patches. I trace them in black, then draw in simple shapes for facial features. I've been enjoying using my white gel pen (Uniball Signo) and a black artist pen (Staedtler Triplus Fineliner) (or any ol' Sharpie will do!) to add details and highlights on top of the watercolors I used below.
Here's one I did this week! There are more imaginary-creature examples on our Halloween Art Board on Pinterest, and I'll post more drawings and tutorials throughout the week!
Want to customize this activity for your toddler? Help them to draw or make shapes on paper. If they can draw dots for eyes, a line for a mouth, lines for hair, they'll have a page of creatures in no-time! If they're not quite ready to draw, cut out blobs of paper for creature bodies, and circles or other fun shapes that they can paste on their blobs, for creature facial features.
Want to share your artwork with us? Use #kasvtgallery on Instagram to be featured in Our Gallery!
Then I took an "Unlock Your Inner Creature" class at Artists' Mediums, over the summer, with Kristin Richland. It was wonderful, and I highly recommend checking out her future creature classes! It went beyond the basics I've described below, to get your brain thinking more creatively! I loved it and have been inspired to make more creatures ever since!
Essentially, you draw any-old shape you want. You can draw it with your eyes closed, or trace the shape of an object you like. Then you add a few basic facial features, maybe some shading, and voila! A creature! Or, in honor of Halloween -- a few spiky teeth or lines for hair would make a pretty neat ghoul or monster!
Another way I love doing this is by painting (using your acrylic spray-paints or just making swishes on the page). Then, I look for animal- or people-like shapes in the blobs of dark and light paint patches. I trace them in black, then draw in simple shapes for facial features. I've been enjoying using my white gel pen (Uniball Signo) and a black artist pen (Staedtler Triplus Fineliner) (or any ol' Sharpie will do!) to add details and highlights on top of the watercolors I used below.
Here's one I did this week! There are more imaginary-creature examples on our Halloween Art Board on Pinterest, and I'll post more drawings and tutorials throughout the week!
Want to customize this activity for your toddler? Help them to draw or make shapes on paper. If they can draw dots for eyes, a line for a mouth, lines for hair, they'll have a page of creatures in no-time! If they're not quite ready to draw, cut out blobs of paper for creature bodies, and circles or other fun shapes that they can paste on their blobs, for creature facial features.
Want to share your artwork with us? Use #kasvtgallery on Instagram to be featured in Our Gallery!
Labels:
art,
art journal,
child,
doodle,
drawing,
Halloween,
Halloween Art,
inspiration,
kids art journal,
painting,
preschooler,
project ideas,
sketchbook,
teenager,
toddler,
tutorial,
watercolor,
zentangle
Thursday, October 16, 2014
DIY Acrylic Spraypaints
OMG yoo guyz!! ..... So, even though it's mid-Halloween-candy-art week, I had to share this! I found this idea while browsing the web and the wonderful world of art journaling!
DIY acrylic spray-paints! I grabbed a couple of old spray bottles -- the ones that our optometrist gives away with glasses cleaner in them (or an old perfume bottle would work). And:

*This can easily be adapted to a toddler art project, with supervision. I'd just recommend using age-appropriate non-toxic paints, of course. You also may want to do this activity outside or with a lot of newspaper on your art table. The spray gets everywhere.
You can spray stencils, cut out your own shapes to put on the page, etc.! Today, I also picked up some supplies at The Art Store. I talked to the woman working there, and she recommended 2 new pens: a white gel pen (Uniball Signo) and a black artist pen (Staedtler Triplus Fineliner) for doodling/tangling on top of watercolors/watered-down acrylics. Both are working fabulously so far, though the Staedtler takes a little while to dry. I recommend propping up your finished pages in front of a fan while working on other pages. I love my Micron pens and will continue to use them for basic doodling, but the Staedtler is the first pen I've found that lets me draw over dried watercolor without picking up any of the pigment.
DIY acrylic spray-paints! I grabbed a couple of old spray bottles -- the ones that our optometrist gives away with glasses cleaner in them (or an old perfume bottle would work). And:
- Rinse them out.
- Spray the sprayer a few times using only water, to rinse it.
- Fill the bottle with about 1 part acrylic paint to 5 parts water.
Or experiment with the ratio. Too much paint may gunk up the sprayer. - Add warm water, and shake to mix!
- Spray away. Warning, it is messy!*
- Add stamps, like I did with the "G" below, or doodles/tangles.

*This can easily be adapted to a toddler art project, with supervision. I'd just recommend using age-appropriate non-toxic paints, of course. You also may want to do this activity outside or with a lot of newspaper on your art table. The spray gets everywhere.
You can spray stencils, cut out your own shapes to put on the page, etc.! Today, I also picked up some supplies at The Art Store. I talked to the woman working there, and she recommended 2 new pens: a white gel pen (Uniball Signo) and a black artist pen (Staedtler Triplus Fineliner) for doodling/tangling on top of watercolors/watered-down acrylics. Both are working fabulously so far, though the Staedtler takes a little while to dry. I recommend propping up your finished pages in front of a fan while working on other pages. I love my Micron pens and will continue to use them for basic doodling, but the Staedtler is the first pen I've found that lets me draw over dried watercolor without picking up any of the pigment.
Labels:
art,
art journal,
books,
child,
doodle,
drawing,
Halloween Art,
inspiration,
kids art journal,
painting,
preschooler,
project ideas,
recycle art,
sketchbook,
supplies,
teenager,
toddler,
tutorial,
watercolor,
zentangle
Monday, October 13, 2014
I Want Candy
In honor of the upcoming Halloween candy feast, we are drawing and creating all things candy!Join us this week as we draw, paint, and create candy artwork (or healthier treats, if you wish)!
Check out some ideas for creating your own -- drawing candy, painting candy, painting ON candy, sculpting with candy, etc. -- on our Halloween Art Pinterest Board here!
And, of course, share your creations with us in Our Gallery via Instagram using #kasvtgallery.
This great little illustration is from the Charlotte Lucie Farmer Illustration Blog.
Saturday, October 11, 2014
Letter Book
Using Post-It notes to work with negative space today!
We stuck strips of sticky notes on the page, painted over them, then pulled them off when the paint was still wet.
We're starting a letter book -- a page for each letter of the alphabet!
Thursday, October 9, 2014
Dream Art
Last night I had a dream that my grandmother was cleaning her kitchen closet. She was wearing a surgical mask to protect her lungs from the dust, but the mask itself was covered in a thick layer of dust. It was a WEIRD dream, but I wanted so badly to illustrate this strange image! More inspiration to learn to draw better!
Dream Drawings are definitely on my art to-do list. What a fun art journal that would be! This week, I also set up a Kids Art Source VT Pinterest account. Now I can actually sort all of our project inspiration, ideas, and tutorials into different boards!
Check out this piece by Jaime Best and more on our new Dream Art board.
And share your art with us in Our Gallery by using #kasvtgallery on Instagram.
Dream Drawings are definitely on my art to-do list. What a fun art journal that would be! This week, I also set up a Kids Art Source VT Pinterest account. Now I can actually sort all of our project inspiration, ideas, and tutorials into different boards!
Check out this piece by Jaime Best and more on our new Dream Art board.
And share your art with us in Our Gallery by using #kasvtgallery on Instagram.
Friday, October 3, 2014
Patio Art
We've lost some of our fun time in the afternoon, with my new work schedule, but there's always time to paint and have a snack outside on the patio. Beautiful day for that! Elle loved having so many rocks and leaves right at her fingertips.
I drew some branches for her, and she ran with it!
Tuesday, September 30, 2014
Altered Books
| Ellie's Art Table! |
My two-year-old has been doing a great job keeping up with her painting and journaling, but I'm a little behind. I've started altering a new book, pics soon, but my little one is proudly and quickly covering her journal with all kinds of sketches of "spiders" and "mountains," and sticking on leaves that she's found outside.
I basically handed her a book, and she ran with it! I love the idea of filling mine with watercolors and zentangles. Any old books or magazines will work , and suddenly the thought of having an endless supply of (recycled) sketchbooks to paint and zentangle in is making me incredibly happy! There really is paper everywhere! Check your recycle bin!
![]() |
| Teresa Collins' Design Team Blog |
Tuesday, September 23, 2014
Art Journal Paint Supplies
I've been really happy with both of these paint brands -- Basics and Premiere -- very much because they're so reasonably priced. The Premiere paint was on sale at A.C. Moore, and a few colors got me started with acrylics. I'm thrilled with the results, and happy to find out that it's much easier to tangle on top of acrylics than watercolors. I also finally picked up two new Sharpie pens last week which made my heart happy. I was barely getting by with the others, which I had worn out almost completely!
I used a ruler to draw a grid and am making the Amalea Zentangle pattern (tutorial here).
Elle did some acrylic painting with me, too, in her journal!
I used a ruler to draw a grid and am making the Amalea Zentangle pattern (tutorial here).
Elle did some acrylic painting with me, too, in her journal!
Monday, September 22, 2014
Heartsy Artsy
Another page of randomness. I don't know why I'm stuck on these "starbursts," maybe exhaustion or lack of imagination, but I'm enjoying filling them with tangles. I wish I felt that I had a true vision with my artwork, but lately I've just been... playing. But that's a good thing, too, right!?
How To: Here, I used a big, checkerboard-pattern stamp to make a background. I stamped over a heart-shaped Post-It note. I dabbed pink and white paint around the heart shape and used a small paintbrush to pull the paint away from the heart. When I took the heart off, some paint had bled through around the edges, so I let it dry then cleaned it up by painting over it with some white acrilyc paint. It didn't cover it completely, but it was white enough to tangle on. Then I tangled away!
You can find some of my favorite zentangle patterns on my Pinterest board here and, on my mommy blog, I give a little tutorial on how to do this swirly pattern, here.
Also, this weekend, Auntie Bee (her site here) took us to a great Burlington gallery where she showed and sold some of her artwork! E loved it, especially the poetry reading and the kids' art corner. The other girls were making leaf art and leaf creatures, so E made her own. Note the eyes over the leaves... melt my heart!
How To: Here, I used a big, checkerboard-pattern stamp to make a background. I stamped over a heart-shaped Post-It note. I dabbed pink and white paint around the heart shape and used a small paintbrush to pull the paint away from the heart. When I took the heart off, some paint had bled through around the edges, so I let it dry then cleaned it up by painting over it with some white acrilyc paint. It didn't cover it completely, but it was white enough to tangle on. Then I tangled away!
You can find some of my favorite zentangle patterns on my Pinterest board here and, on my mommy blog, I give a little tutorial on how to do this swirly pattern, here.
Also, this weekend, Auntie Bee (her site here) took us to a great Burlington gallery where she showed and sold some of her artwork! E loved it, especially the poetry reading and the kids' art corner. The other girls were making leaf art and leaf creatures, so E made her own. Note the eyes over the leaves... melt my heart!
Thursday, September 18, 2014
Art Journal Idea - Letter Art
![]() |
| Ingrid Padilla Art |
I love how simple doodles and adding a touch of watercolor can really create a beautiful piece of artwork! This would be great for a kiddo's art journal page or cover! For toddlers, you could draw the letter, then have them paint it!
I like to sneak little Es into all of my artwork as a little "hello" to my daughter, but I may just have to make one huge E like this for her!
Wednesday, September 17, 2014
Kids' Art Journals
Okay, so, would anyone be opposed to me dedicating the next month+ to art journaling? All in favor? Let's just do it. Haha!
Art journals are our go-to on any day that I don't have a "real" craft planned, so... most days since I've gone back to full-time at my day job!
But, Elle loves it! She knows that, in the afternoon, she can grab her book and do whatever she wants with it. Last week, I went through the recycleables and found some foam packing material, and she pulled it apart and glued it all over her journal pages. Then she painted them. I was having a little anxiety, because the journal doesn't even close now, but that's how it should be, right!?
Anyway, Pinterest has some fantastic ideas for Kids' Art Journaling! Prompts, tutorials, etc.!
Here is what I found in my net surfing:
Art journals are our go-to on any day that I don't have a "real" craft planned, so... most days since I've gone back to full-time at my day job!
But, Elle loves it! She knows that, in the afternoon, she can grab her book and do whatever she wants with it. Last week, I went through the recycleables and found some foam packing material, and she pulled it apart and glued it all over her journal pages. Then she painted them. I was having a little anxiety, because the journal doesn't even close now, but that's how it should be, right!?
Anyway, Pinterest has some fantastic ideas for Kids' Art Journaling! Prompts, tutorials, etc.!
Here is what I found in my net surfing:
- One - Pinterest search for Kids' Art Journals
- Two - How to make your own journals (ABeautifulMess.com, pic below)
- Three - How to alter old board-books for journaling! (CreativeWithKids.com)
- Four - Kids' Art Journal Prompts
- Five - Learn about Smash Books & How to Make Your Own!
- Six - Check out our own Toddler Smash Book! (YourMomIsStrange.com)
- Seven - Consider picking up a Wreck This Journal book, with prompts for creative destruction!
- Eight - Learn about the art of doodling/zentangling! (InnerChildFun.com)
- Nine - How about some print-making ideas to spruce up those pages? (TinyRottenPeanuts.com)
- Ten - Explore some around-the-house painting tools! (LessonsLearntJournal.com)
![]() |
| Photo from ABeautifulMess.com! |
Monday, September 15, 2014
Ain't No Mountain High Enough
And the art journaling continues! I think it would have been simpler if I had created a cut-out of the Camel's Hump mountain range to paint over. I ended up sketching it with a white crayon, from memory (hmm). It was the only thing in my travel art kit at the time, and I was too lazy to get out of bed to find a pencil. Lesson learned.
The good: The paint wouldn't stick to the wax crayon line.
The bad: Neither would the black ink of my Micron pen. I had to do multiple coats. It's not the worst thing in the world, but I'll have to fine tune some of these steps before selling prints.
The ugly: I don't know how pretty this one will be. Will have to see when I'm done!
Now that I'm feeling more confident, I'm going to start painting these on some nice, watercolor paper and selling them in my shop!
Do you have any favorite mountain ranges in Vermont? I'd love to paint and tangle them!
The good: The paint wouldn't stick to the wax crayon line.
The bad: Neither would the black ink of my Micron pen. I had to do multiple coats. It's not the worst thing in the world, but I'll have to fine tune some of these steps before selling prints.
The ugly: I don't know how pretty this one will be. Will have to see when I'm done!
Now that I'm feeling more confident, I'm going to start painting these on some nice, watercolor paper and selling them in my shop!
Do you have any favorite mountain ranges in Vermont? I'd love to paint and tangle them!
Labels:
art,
doodle,
drawing,
inspiration,
nature,
painting,
project ideas,
sketchbook,
teenager,
zentangle
Saturday, September 13, 2014
Acrylic Tangle
I'm really pleased with how this acrylic tangle turned out! Stay tuned, as I make a few to sell in our Etsy shop! I'm hoping to make some Vermont-themed ones soon, too!
To make this one, I made a circle in the middle of the page by dipping the top of a plastic coffee cup in dark-colored paint blobs and stamping it on the page. Then I used a big paintbrush with white acrylic paint and "pulled" the dark paint away from the middle. I had to experiment with adding in more dark paint and pulling it outward until it was just right. Once dry, I made a tangle pattern in the middle.
Labels:
art,
doodle,
drawing,
inspiration,
nature,
painting,
project ideas,
sketchbook,
teenager,
tutorial,
zentangle
Golf Ball Print
Forgive us, as we're going to be doing a lot more painting and print-making around here for awhile! I'm just obsessed right now! Today, Elle and I made prints with a golf ball!
Instagram user, momintheburbs, told me that she did the same with her son but put a piece of paper in a shoebox (or Tupperware container) with a lid on it. That would have definitely saved us some messy hands! We'll try that next time!
Thursday, September 11, 2014
Art in the Mean Time
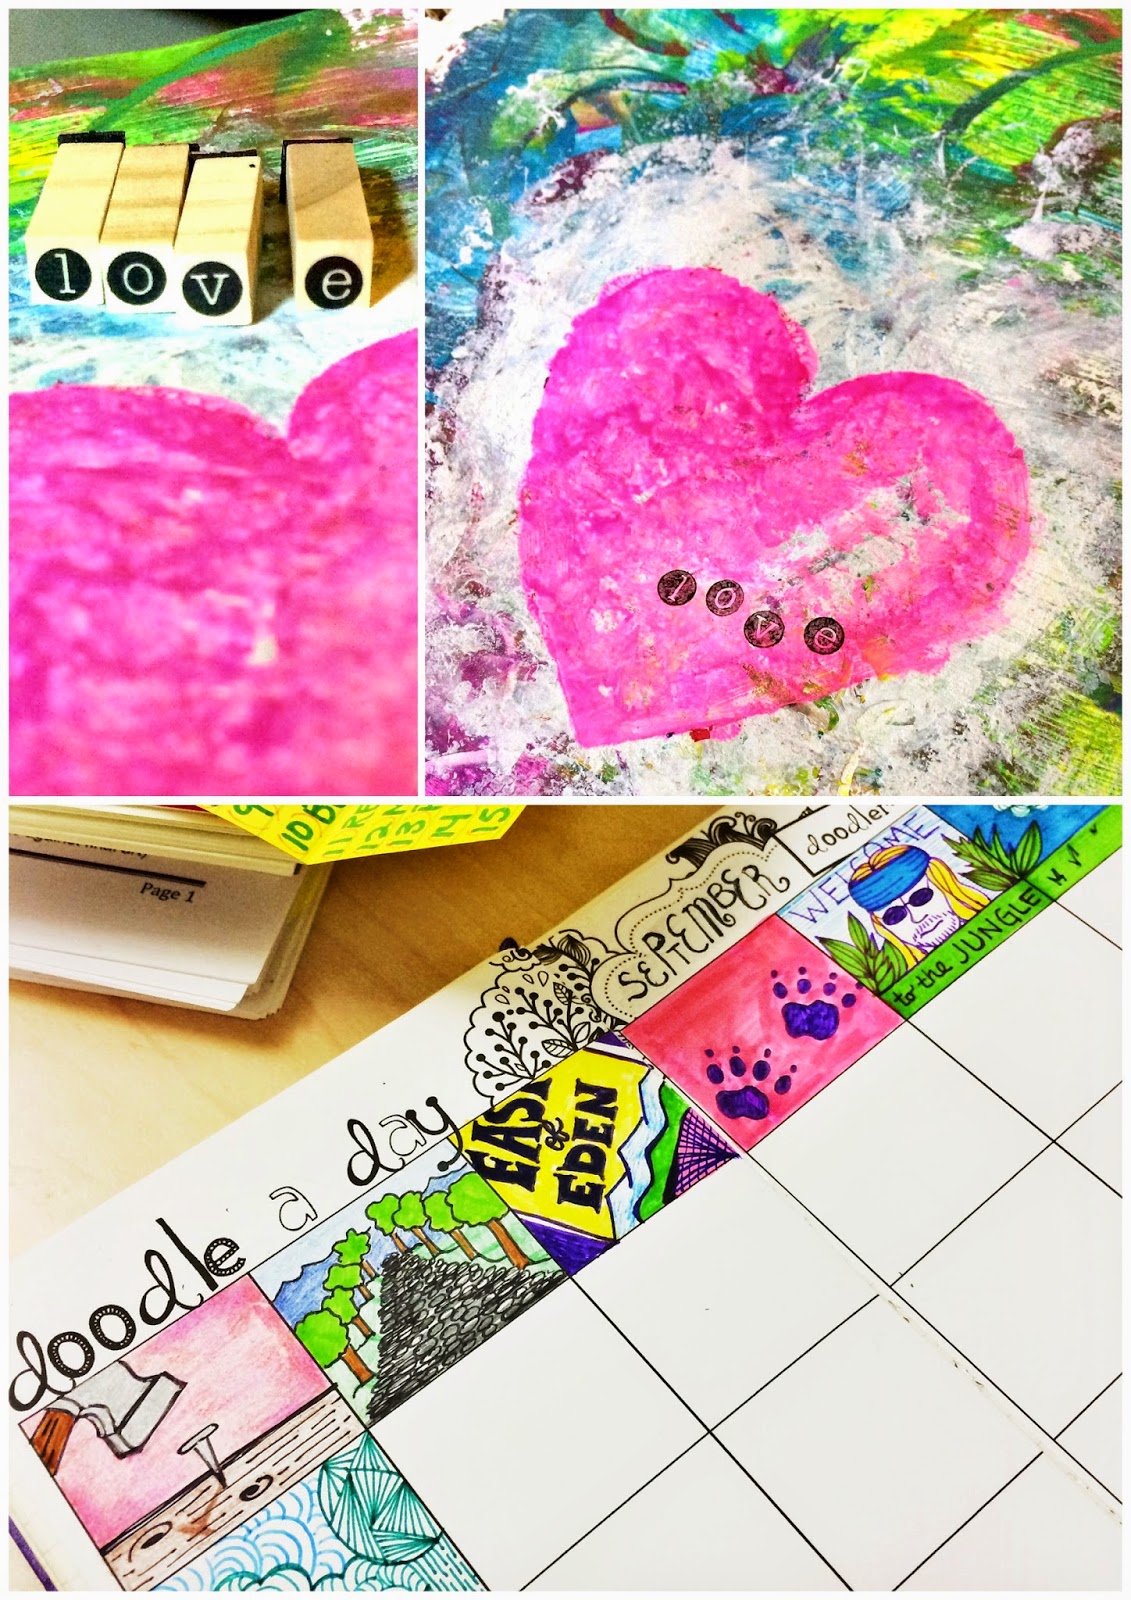
I'm working away at my art journal and doodle-a-day challenge as time allows. E helped me create the "love" page. I put on a gesso coat first and let it dry. Then she helped add acrylic layers of paint on top. I used an upside-down yogurt container to make swirls in the paint, added some blotted-on gesso, then used a stencil to make the neon-pink heart, stamps to finish it!
While we're taking a little recap holiday, feel free to check out our Kids Art Source VT Board on Pinterest (here) for fall project ideas and more!
As always, you can share your art with us by using #kasvtgallery on Instagram and view our reader-submitted artwork on our gallery page (here).
Labels:
art,
child,
doodle,
drawing,
inspiration,
painting,
preschooler,
project ideas,
sketchbook,
teenager,
tutorial
Subscribe to:
Posts (Atom)